We Recreated Bunnie Xo's Nails At Home On A Budget & Are Obsessed With The Blinged-Out Look
Your nails are a literal extension of your style and personality, and few celebrities exemplify this as well as Bunnie Xo (also known as Alyssa DeFord). The social media sensation, owner of Dumb Blonde Productions, and spouse of country singer Jelly Roll is known for sporting some seriously eye-catching sets on her social media pages. Bunnie Xo's nails are the embodiment of everything extra, featuring lengthy stiletto tips, McBling rhinestone nail art, and layers of glittery polish. Her expressive manicures have taken on a life of their own, with the star regularly posting updates from the salon chair and answering fan questions about her noteworthy nails.
Basically, from her TikTok posts to her red-carpet appearances at events — like The 2024 ACM Awards, where she sadly landed on our worst-dressed list — Bunnie Xo's nails consistently steal the show. Her extravagant manis have inspired countless beauty lovers to follow her lead, but any seasoned salon-goer can tell you that intricate rhinestone designs like Bunnie's aren't always easy on the wallet. If you've been coveting Bunnie Xo's nails but have sworn off spendy nail salon trips, I've got good news for you. After gleaning inspiration from the blond beauty's feed, I've developed a budget-friendly Bunnie Xo nail set that any lacquer lover can try at home. With just a few supplies — and a bit of patience — you can rock Bunnie Xo-style nails without breaking the bank.
Supplies you'll need for Bunnie Xo-inspired nails
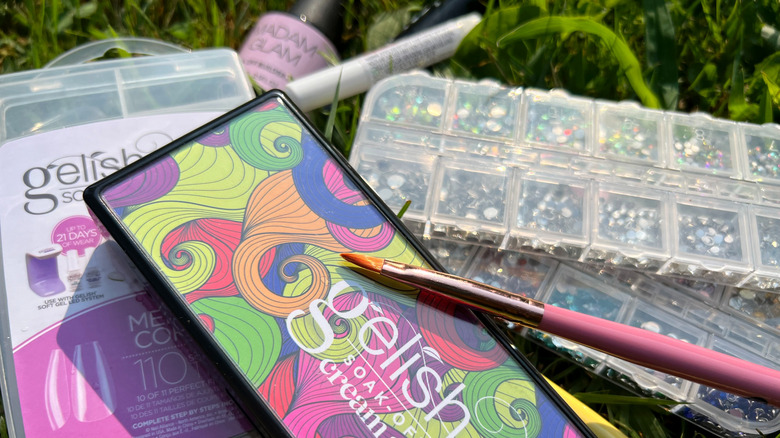
Despite their luxurious look, Bunnie Xo's nails are surprisingly easy to pull off on a budget. Now, unless you're blessed with naturally long nails, chances are you'll need artificial nail tips and adhesive glue. As Bunnie's extra-long tips can be difficult to find on beauty store shelves, I went with Gelish's Medium Stiletto Tips ($12.99). Still, you can find extra-long tips similar to Bunnie's online — for example, Aprés Nail's Extra Long Stiletto Tips ($16.99). After that, it's time to pick up a base polish. I used Madam Glam's Peel-Off Base Coat ($10.98), a buildable gel with a subtle pink hue.
Now that you've chosen a base, grab a secondary color or two to add some extra pizzazz. You'll use this additional shade to paint on Bunnie Xo's signature nail art, from French tips to tiny stars. For my manicure, I used a Gelish Cream Gel Palette in Neon & On & On ($16.99). Naturally, rhinestones are another must-have for Bunnie Xo nails. Any flatback rhinestone or crystal will do, though you should try to match the color of your stones to the shade of your polish as best as you can. Last but not least, nail art brushes are essential to paint on precise designs. You can find affordable nail art brushes at brick-and-mortar beauty shops or purchase fine-tipped painting brushes from a craft store. The best part is that you can get these products for the same amount of money (or less) than a single salon trip would cost, but they'll last for quite a few manicures, saving you so much money in the long run.
Start your Bunnie Xo nails with stiletto tips
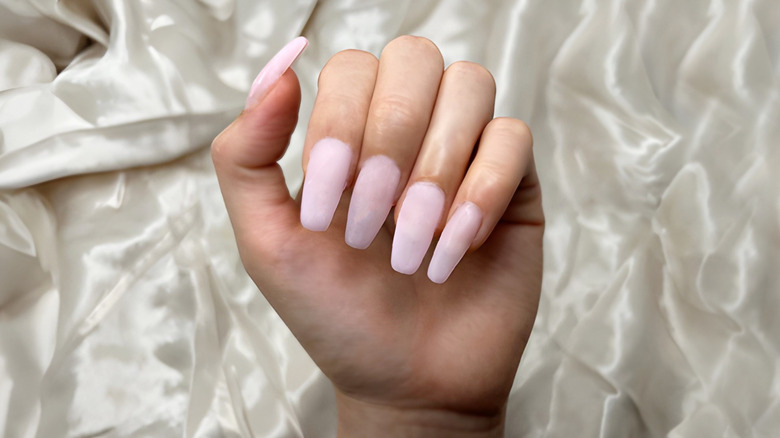
If using artificial extensions, begin your Bunnie Xo set by matching a stiletto tip to each nail, and use nail glue or gel adhesive to secure them firmly against your natural nails. For extra glitz and glam, you can choose polish with a glitter or shimmer finish instead of a plain base coat. But whether you use traditional lacquer or a gel like Madam Glam's Peel-Off Base Coat, be sure to paint slowly and carefully to ensure the product doesn't spill onto your cuticles. In case of mistakes, simply use a silicone nail tool or a clean fingernail to scrape away any excess product before it dries or cures. Cure each coat of gel nail polish underneath UV or LED light to harden the product — usually, this process takes about 30 to 60 seconds per layer.
From there, it's necessary to wipe down each nail with a splash of surface cleanser applied to a lint-free pad or cotton ball. If you don't own gel polish surface cleanser, don't fret. In a pinch, you can mix three parts isopropyl alcohol with one part acetone or use an alcohol-based wipe to remove the sticky coating from your just-cured nails. Allow the paint to fully air-dry before applying additional coats of gel polish or nail lacquer. Once you're satisfied with the overall shape and finish of your base layer, it's time to move on to the fun stuff: painting Bunnie Xo's nail art.
Brighten things up with Bunnie Xo-inspired nail art
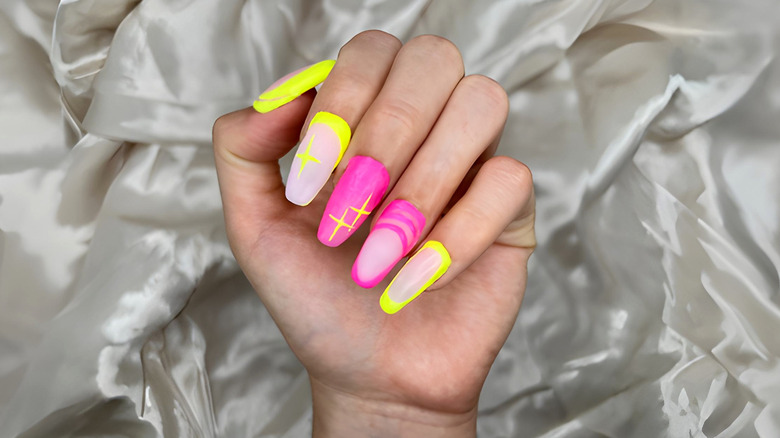
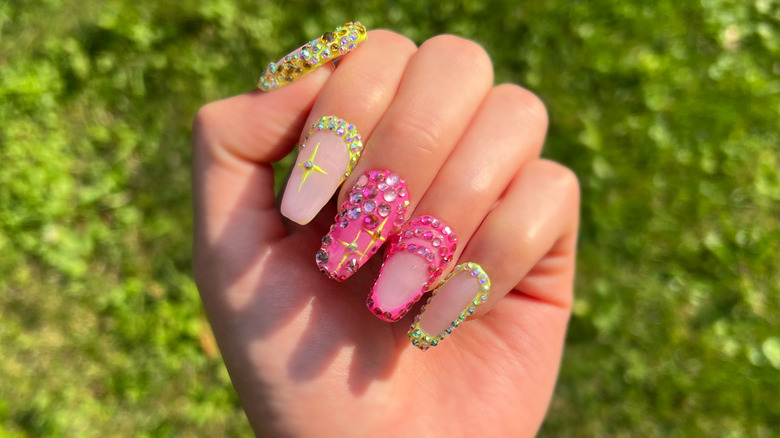
Bunnie Xo doesn't always follow the same formula when it comes to her nail art, but she does seem to favor a few looks in particular. To accentuate her elongated stiletto nails, the star tends toward French tips, swirls, and meticulously outlined graphic nail art. Oftentimes, she mixes and matches different designs on alternating nails for a playful, unique look that's all her own. No wonder Jelly Roll can't take his eyes off of her! So, take a page from Bunnie's book and unburden yourself from traditional nail-art rules — make one accent nail two, flip the tip and paint your moons, or let your imagination run free with scrolls and swirls.
After studying several of my favorite Bunnie Xo nail designs, I decided to go with the following: a swirl along the side of my thumb, a star and "moon" on the index finger's tip, full color for my middle finger, and outlines on the ring finger and pinkie. Using a thin, fine nail-art brush, I delicately painted each design and cured them for 15 to 30 seconds under my UV light, depending on their thickness. Don't worry if your design has a few inconsistencies, as you'll be adding another layer to hide any glaring flaws. At this point in the process, you're on a roll with your Bunnie Xo manicure, and it's nearly time for the finishing touches.
Seal the look with a kiss of rhinestones

It's important to handle the final step of this manicure with love and care, so pop on your favorite series or some motivational background music to stay focused. Your supplies should include flatback rhinestones, adhesive glue or clear gel, and a wax pencil or tweezers. For my Bunnie Xo nails, which featured pink and yellow polish, I opted for a mix of hot pink, baby pink, and iridescent yellow rhinestones. Larger designs, like my pink middle fingernail, benefit from a mix of large, medium, and small rhinestones. Outlines and smaller accents, such as stars, look their best with small rhinestones in order to preserve the delicate linework.
Before affixing the stones, trace your nail art design with the clear adhesive of your choice. Those using classic nail polish can set and seal their rhinestones with a clear, thick lacquer, like the China Glaze For Rhinestone Only Base and Top Coat ($7). If using gel polish, select a clear rhinestone glue or topcoat with a glossy finish. While your clear coat or glue is still sticky, pick up a rhinestone with the tip of a wax pencil or tweezers. Next, place it on top of the colored portion of your nail art, making sure to stay within the lines of the design. Traditional top coat and nail glue should dry within one to two minutes, while gel adhesive will take between 30 to 90 seconds to cure. Now, with your Bunnie Xo nails complete, it's time to show your sparkle off!